※ 본 썸네일은 나노바나나 AI를 통해 생성된 합성 데이터입니다.
"손상된 옷 이미지가 100장밖에 없는데, 어떻게 학습시키지?"
들어가며
의류 품질 검사 AI 프로젝트를 진행하면서 만난 현실적인 문제다.
데이터 현황:
- 정상 의류: 10,000장
- 손상 의류: 100장
- 오염 의류: 50장

문제: 극심한 클래스 불균형
팀 회의에서 나온 해결책들:
A: "회전시키고 노이즈 주면 되지 않나요?"
B: "나노바나나로 생성하면 되잖아요."
C: "그냥 복사해서 늘리면 안 돼요?"
다들 맞는 말인데, 정확한 용어를 몰라서 소통이 어려웠다.
오늘은 AI 데이터 처리에서 가장 헷갈리는 3가지 개념을 정리한다.
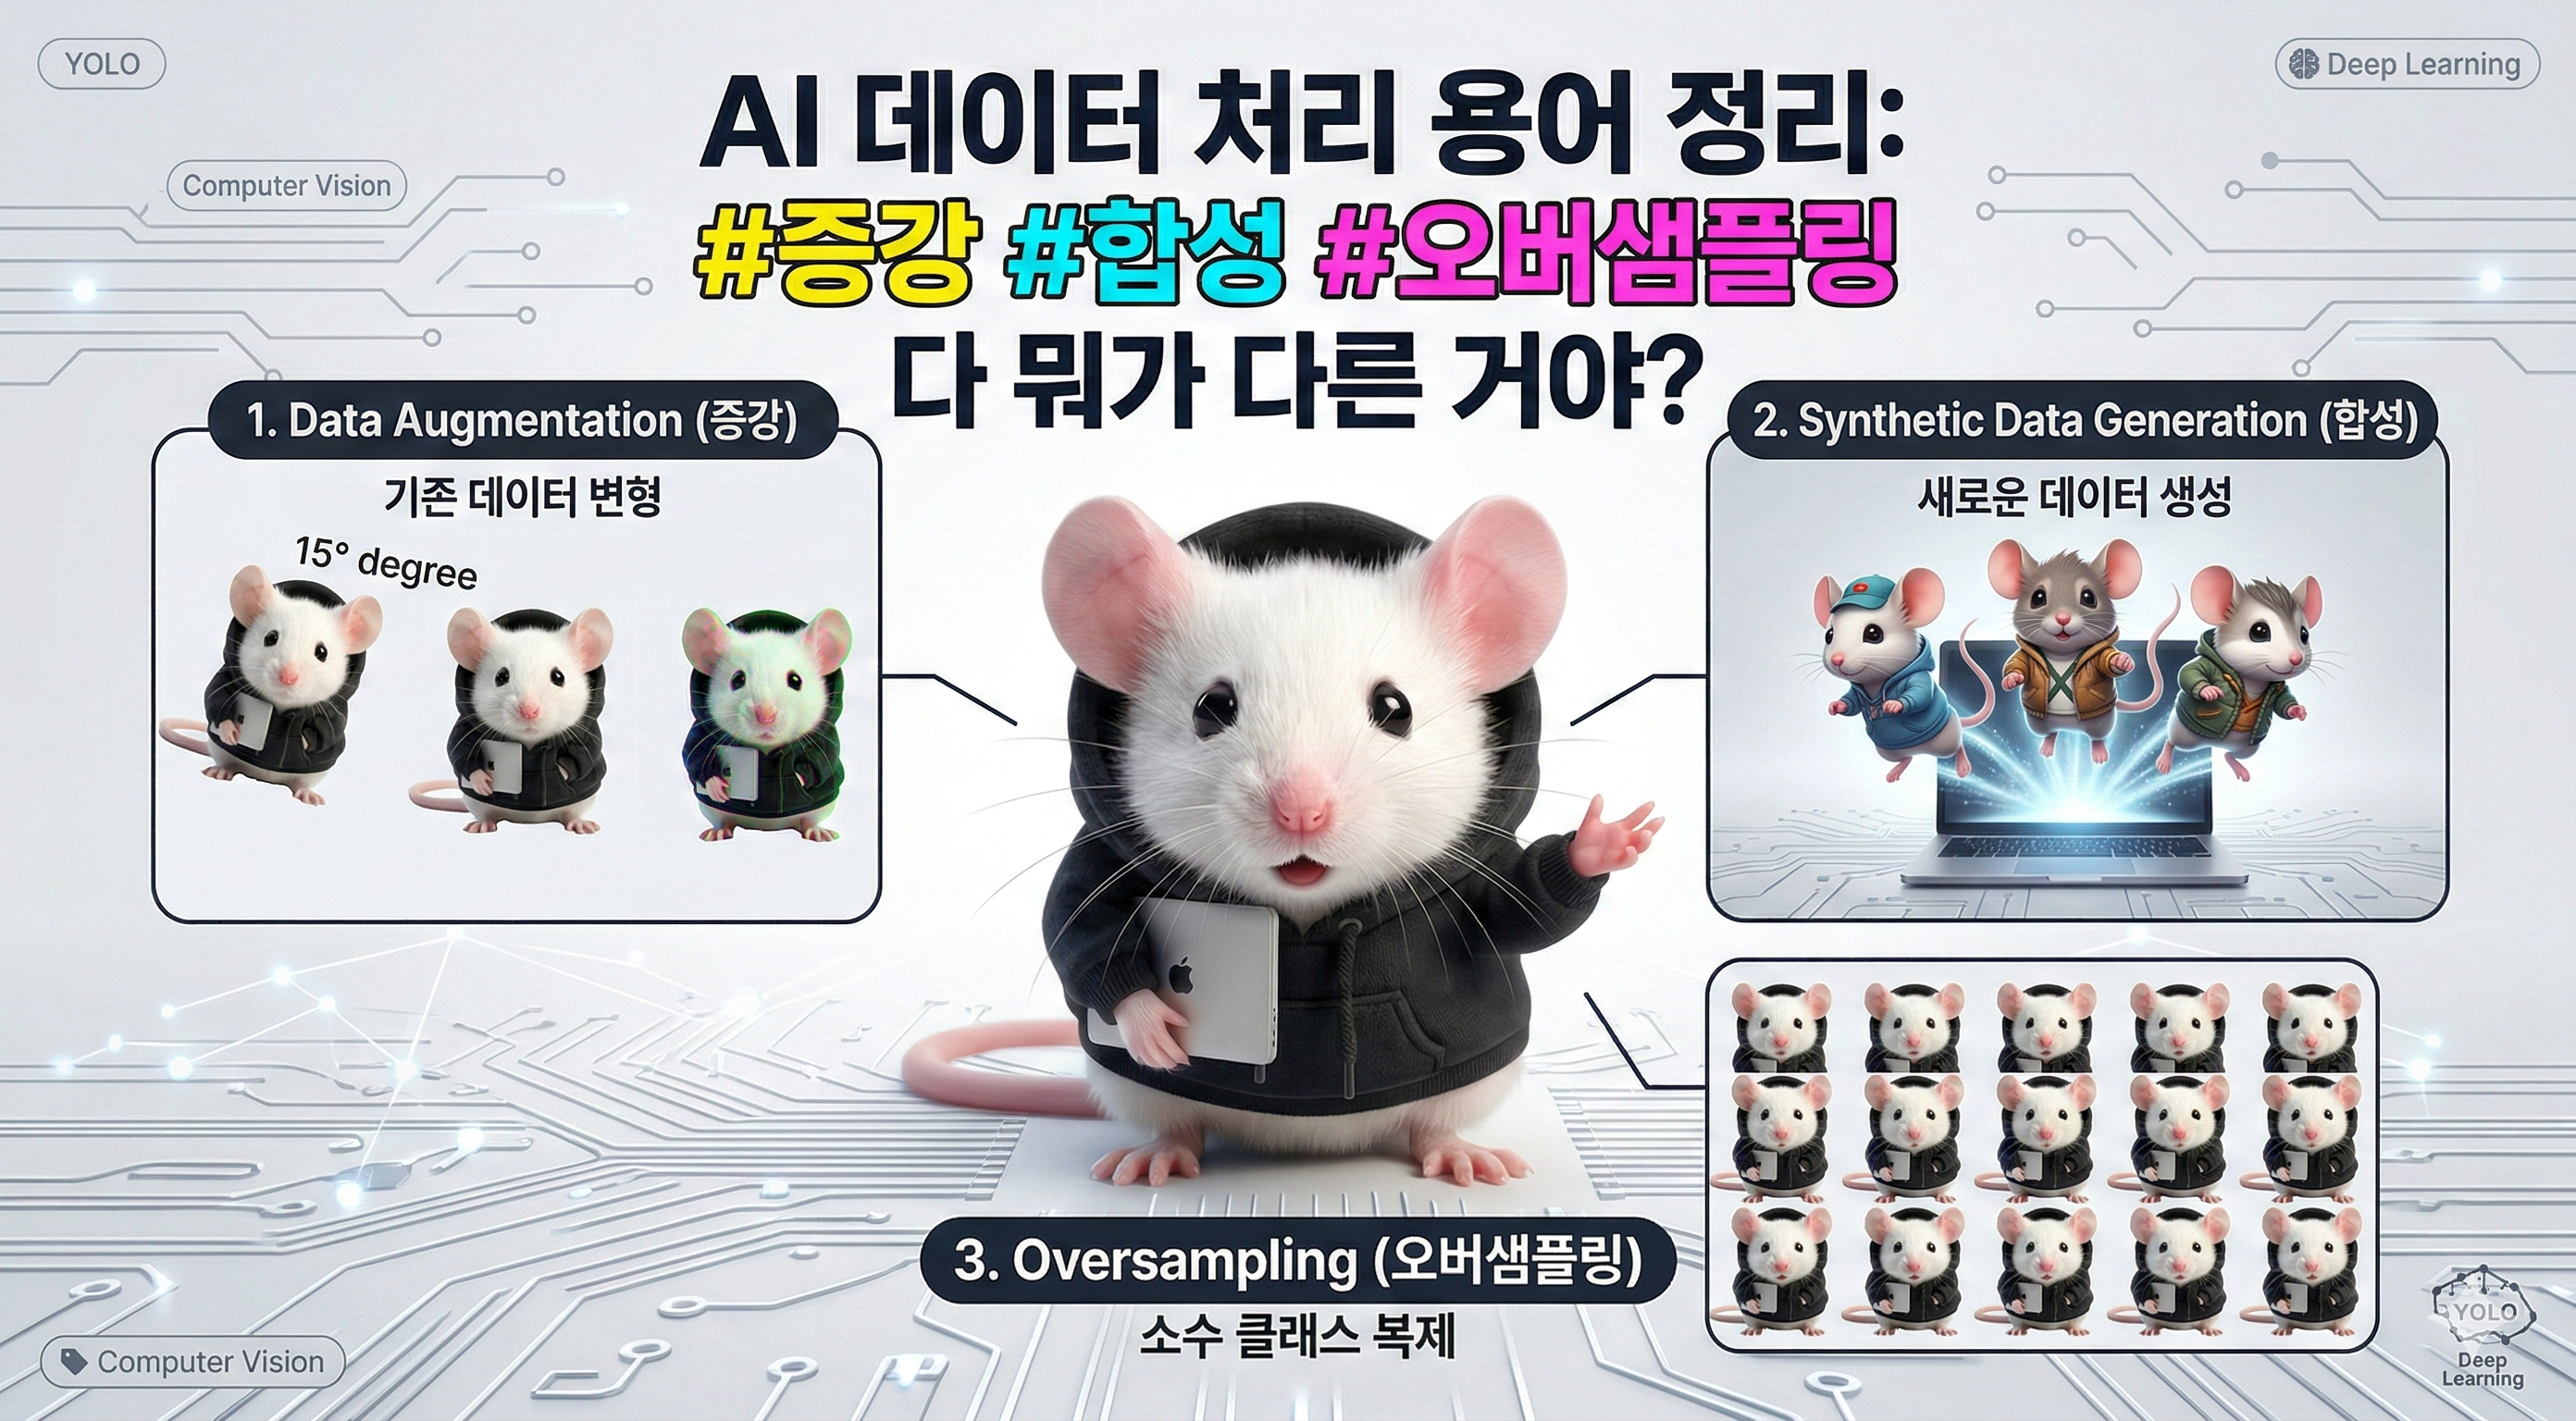
핵심 용어 3가지
1. Data Augmentation (데이터 증강)
정의:
기존 데이터를 "변형"해서 다양성을 늘리는 기법핵심:
❌ 새로운 데이터 생성 (X)
✅ 기존 데이터 변형 (O)
예시:
# 원본 이미지 1장
original_image.jpg

# Augmentation 적용
↓
rotated_15deg.jpg       # 15도 회전
flipped_horizontal.jpg  # 좌우 반전
with_noise.jpg          # 노이즈 추가
brightness_+20.jpg      # 밝기 조정

결과: 1장 → 5가지 변형
(하지만 모두 같은 원본에서 파생)
구현 예시:
# PyTorch
from torchvision import transforms

augmentation = transforms.Compose([
    transforms.RandomRotation(15),           # 랜덤 회전
    transforms.RandomHorizontalFlip(0.5),    # 50% 확률 좌우 반전
    transforms.ColorJitter(                  # 색상 변형
        brightness=0.2,
        contrast=0.2,
        saturation=0.2
    ),
    transforms.GaussianBlur(3),              # 가우시안 블러
])

augmented_image = augmentation(original_image)
# Ultralytics YOLO
# augment.yaml
augmentation:
hsv_h: 0.015 # Hue (색조)
hsv_s: 0.7 # Saturation (채도)
hsv_v: 0.4 # Value (명도)
degrees: 15.0 # 회전 각도
translate: 0.1 # 이동
scale: 0.5 # 크기 변경
shear: 0.0 # 전단 변환
perspective: 0.0
flipud: 0.5 # 상하 반전 확률
fliplr: 0.5 # 좌우 반전 확률
mosaic: 1.0 # 모자이크 증강
mixup: 0.0 # Mixup 증강2가지 방식:
Online Augmentation (실시간 증강)
# 학습 중 매 에폭마다 실시간 적용
for epoch in range(100):
    for batch in dataloader:
        # 매번 다른 변형 적용
        augmented_batch = augment(batch)
        loss = model.train(augmented_batch)
장점:
✅ 디스크 공간 절약
✅ 무한한 변형 (에폭마다 다름)
✅ 메모리 효율적
단점:
❌ 학습 속도 약간 느림 (변형 오버헤드)Offline Augmentation (사전 증강)
# 학습 전에 미리 변형 이미지 생성
for image in original_images:
    for i in range(5):  # 이미지당 5개 변형
        augmented = augment(image)
        save(f"{image_name}_aug_{i}.jpg")

# 학습 시에는 변형된 이미지 사용
model.train(augmented_images)
장점:
✅ 학습 속도 빠름 (변형 미리 완료)
✅ 재현 가능 (같은 변형)
단점:
❌ 디스크 공간 많이 사용
❌ 변형 개수 고정Augmentation의 목적:
1. 과적합 방지
   - 훈련 데이터만 외우는 것 방지
   - 일반화 성능 향상

2. 데이터 다양성 증가
   - 다양한 각도, 조명 학습
   - 실전 환경 대응력 향상

3. 모델 강건성 (Robustness)
   - 노이즈에 강한 모델
   - 변형에 덜 민감한 예측
주의사항:
# ❌ 나쁜 예: 과도한 증강
augmentation = transforms.Compose([
    transforms.RandomRotation(180),  # 180도 회전 (상하 뒤집힘)
    transforms.ColorJitter(brightness=0.9),  # 너무 밝게
    transforms.GaussianNoise(std=0.5)  # 노이즈 과다
])
# → 원본과 너무 달라져서 오히려 성능 저하

# ✅ 좋은 예: 적절한 수준
augmentation = transforms.Compose([
    transforms.RandomRotation(15),   # 자연스러운 범위
    transforms.ColorJitter(brightness=0.2),  # 미세 조정
    transforms.GaussianNoise(std=0.01)  # 미세 노이즈
])
2. Synthetic Data Generation (합성 데이터 생성)
정의:
실제로 존재하지 않는 "새로운" 데이터를 생성하는 기법핵심:
❌ 기존 데이터 변형 (X)
✅ 완전히 새로운 데이터 생성 (O)
Augmentation과의 차이:
Augmentation (증강):
원본: 고양이 사진
결과: 회전된 고양이, 밝은 고양이, 노이즈 낀 고양이
→ 같은 고양이의 변형

Synthesis (합성):
입력: "고양이 사진"
결과: AI가 생성한 전혀 새로운 고양이
→ 다른 고양이
생성 방법 3가지:
1) Generative AI (생성형 AI)
# Stable Diffusion
from diffusers import StableDiffusionPipeline

pipe = StableDiffusionPipeline.from_pretrained(
    "stabilityai/stable-diffusion-2-1"
)

# 텍스트로 이미지 생성
prompt = "damaged denim jeans with torn hole on knee"
image = pipe(prompt).images[0]
# DALL-E API
import openai
response = openai.Image.create(
prompt="stained white t-shirt with coffee spill",
n=10,
size="1024x1024"
)
for i, image_url in enumerate(response['data']):
download(image_url, f"synthetic_stain_{i}.jpg")2) 3D Rendering (3D 렌더링)
# Blender Python API
import bpy

# 3D 모델 로드
bpy.ops.import_scene.obj(filepath="tshirt.obj")

# 손상 텍스처 적용
damage_texture = bpy.data.images.load("damage_pattern.png")

# 다양한 각도에서 렌더링
for angle in range(0, 360, 30):
    camera.rotation_euler[2] = angle
    bpy.ops.render.render(write_still=True)
3) Cut-and-Paste (잘라붙이기)
import cv2
import numpy as np

# 정상 의류 이미지
normal_image = cv2.imread("normal_shirt.jpg")

# 손상 패턴 (실제 손상 부분만 추출)
damage_patch = cv2.imread("damage_pattern.png", cv2.IMREAD_UNCHANGED)

# 랜덤 위치에 붙이기
x = np.random.randint(0, normal_image.shape[1] - damage_patch.shape[1])
y = np.random.randint(0, normal_image.shape[0] - damage_patch.shape[0])

# 알파 블렌딩
alpha = damage_patch[:, :, 3] / 255.0
for c in range(3):
    normal_image[y:y+h, x:x+w, c] = (
        alpha * damage_patch[:, :, c] +
        (1 - alpha) * normal_image[y:y+h, x:x+w, c]
    )

cv2.imwrite("synthetic_damaged_shirt.jpg", normal_image)
실전 구현 예시:
# workers/synthesis/synthesizer.py
class ImageSynthesizer:
    def __init__(self, model_name="nanonana/damage-generator"):
        self.pipeline = StableDiffusionPipeline.from_pretrained(model_name)

    def generate_damaged_images(
        self,
        garment_type: str,
        damage_type: str,
        num_images: int = 100
    ):
        """
        손상 의류 합성 이미지 생성
        """
        prompts = [
            f"{damage_type} {garment_type}, realistic photo",
            f"{garment_type} with {damage_type}, high quality",
            f"damaged {garment_type}, {damage_type} visible"
        ]

        generated_images = []
        for i in range(num_images):
            prompt = np.random.choice(prompts)
            image = self.pipeline(
                prompt,
                num_inference_steps=50,
                guidance_scale=7.5
            ).images[0]

            generated_images.append(image)

        return generated_images

# 사용
synthesizer = ImageSynthesizer()
damaged_jeans = synthesizer.generate_damaged_images(
    garment_type="denim jeans",
    damage_type="torn hole",
    num_images=1000
)
Synthesis의 장점:
✅ 데이터 부족 문제 해결
   - 희귀 케이스 생성 (손상, 오염)

✅ 무한한 다양성
   - 다양한 손상 패턴
   - 다양한 각도, 조명

✅ 레이블링 자동화
   - 생성 시 레이블 알고 있음
   - 바운딩 박스 자동 생성
Synthesis의 단점:
❌ 생성 품질 불안정
   - 이상한 이미지 생성 가능
   - 수동 필터링 필요

❌ 실제와 차이 (Domain Gap)
   - AI 생성 이미지 ≠ 실제 사진
   - 모델이 합성 데이터만 학습하면 실전 성능 저하

❌ 계산 비용
   - GPU 필요
   - 생성 시간 오래 걸림
3. Oversampling (오버샘플링)
정의:
소수 클래스의 데이터를 늘려서 클래스 불균형을 해소하는 기법클래스 불균형 문제:
데이터:
- 정상: 10,000장 (99%)
- 손상: 100장 (1%)

학습 결과:
모델: "다 정상이야!"
정확도: 99% (하지만 손상은 하나도 못 찾음)

문제: 소수 클래스 무시
Oversampling 방법 4가지:
1) Naive Oversampling (단순 복제)
# 소수 클래스 단순 복제
damaged_images = [img1, img2, img3]  # 3장

# 100번 복제
oversampled = damaged_images * 100

# 결과: 300장 (하지만 모두 같은 이미지 반복)
장점:
✅ 구현 간단
✅ 빠름
단점:
❌ 과적합 위험 (같은 이미지 반복 학습)
❌ 다양성 없음2) Random Oversampling with Augmentation
from sklearn.utils import resample
import albumentations as A

# Augmentation 정의
augment = A.Compose([
    A.RandomRotate90(),
    A.HorizontalFlip(p=0.5),
    A.ColorJitter(0.2, 0.2, 0.2),
    A.GaussianBlur(p=0.3)
])

# 소수 클래스 오버샘플링
damaged_images = [img1, img2, img3]
target_count = 1000

oversampled = []
while len(oversampled) < target_count:
    # 랜덤 선택
    img = np.random.choice(damaged_images)
    # Augmentation 적용
    augmented = augment(image=img)['image']
    oversampled.append(augmented)
장점:
✅ 다양성 증가
✅ 과적합 완화
단점:
❌ 여전히 원본 데이터 기반3) SMOTE (Synthetic Minority Oversampling Technique)
from imblearn.over_sampling import SMOTE

# 특징 공간에서 보간
# (주로 tabular 데이터에 사용)
smote = SMOTE(sampling_strategy='auto')
X_resampled, y_resampled = smote.fit_resample(X, y)
원리:
1. 소수 클래스 샘플 선택
2. k-최근접 이웃 찾기
3. 이웃 사이를 보간해서 새 샘플 생성
예시:
샘플 A: [0.1, 0.2, 0.5]
샘플 B: [0.2, 0.3, 0.6]
새 샘플: [0.15, 0.25, 0.55] (중간값)장점:
✅ 새로운 샘플 생성
✅ 특징 분포 유지
단점:
❌ 이미지에는 비효율적
❌ 픽셀 보간이 의미 없을 수 있음4) Generative Oversampling (생성형 오버샘플링)
# Stable Diffusion으로 소수 클래스 생성
class GenerativeOversampler:
    def __init__(self, model):
        self.model = model

    def oversample(self, minority_class, target_count):
        """
        소수 클래스를 생성형 AI로 오버샘플링
        """
        synthetic_images = []

        while len(synthetic_images) < target_count:
            # AI로 새 이미지 생성
            prompt = f"{minority_class} realistic photo"
            image = self.model.generate(prompt)

            # 품질 검증 (선택적)
            if self.quality_check(image):
                synthetic_images.append(image)

        return synthetic_images

# 사용 예시
oversampler = GenerativeOversampler(nanonana_model)
damaged_images = oversampler.oversample(
    minority_class="damaged denim jeans",
    target_count=5000
)
장점:
✅ 완전히 새로운 이미지
✅ 높은 다양성
✅ 과적합 최소화
단점:
❌ 생성 비용 높음
❌ Domain Gap 위험
❌ 품질 검증 필요3가지 접근법 비교
클래스 불균형 해결 전략
┌──────────────┬────────────────────────┬────────────────────────────┐
│   접근법     │          방법          │            예시            │
├──────────────┼────────────────────────┼────────────────────────────┤
│ Data-level   │ 데이터 자체 조정       │ Oversampling               │
│              │                        │ Undersampling              │
│              │                        │ Synthetic Generation       │
├──────────────┼────────────────────────┼────────────────────────────┤
│ Algorithm-   │ 학습 알고리즘 조정     │ Class Weights              │
│ level        │                        │ Focal Loss                 │
│              │                        │ Cost-sensitive Learning    │
├──────────────┼────────────────────────┼────────────────────────────┤
│ Hybrid       │ 둘 다 병행             │ Synthesis + Focal Loss     │
│              │                        │ Oversampling + Weights     │
└──────────────┴────────────────────────┴────────────────────────────┘
Data-level 접근:
# Oversampling (소수 클래스 늘림)
damaged_images = damaged_images * 100

# Undersampling (다수 클래스 줄임)
normal_images = random.sample(normal_images, 1000)

# 결과: 균형 잡힌 데이터셋
Algorithm-level 접근:
# Class Weights
from torch.nn import CrossEntropyLoss

# 소수 클래스에 높은 가중치
loss_fn = CrossEntropyLoss(
    weight=torch.tensor([1.0, 100.0])  # [정상, 손상]
)

# Focal Loss (어려운 샘플에 집중)
class FocalLoss(nn.Module):
    def __init__(self, alpha=0.25, gamma=2):
        super().__init__()
        self.alpha = alpha
        self.gamma = gamma

    def forward(self, inputs, targets):
        # 잘못 예측한 샘플에 높은 가중치
        pt = torch.exp(-ce_loss)
        focal_loss = self.alpha * (1 - pt) ** self.gamma * ce_loss
        return focal_loss.mean()
Hybrid 접근 (권장):
# 1. Data-level: Generative Oversampling
synthetic_damaged = synthesizer.generate(count=5000)

# 2. Algorithm-level: Class Weights
model.train(
    data=augmented_data,
    class_weights='auto',  # 자동 계산
    loss='focal'  # Focal Loss
)

# 결과: 가장 강력한 성능
우리 프로젝트 적용 사례
문제 상황
의류 품질 검사 데이터:
- 정상: 10,000장
- 손상: 100장 (구멍, 찢어짐)
- 오염: 50장 (얼룩)

클래스 비율: 200:2:1 (극심한 불균형)
해결 전략
Phase 1: Augmentation (빠른 개선)
# configs/augment.yaml
augmentation:
  degrees: 15.0       # 회전
  translate: 0.1      # 이동
  scale: 0.5          # 크기
  flipud: 0.5         # 상하 반전
  fliplr: 0.5         # 좌우 반전
  mosaic: 1.0         # 모자이크
# Ultralytics 자동 적용
from ultralytics import YOLO
model = YOLO('yolov8n.pt')
model.train(
data='dataset.yaml',
cfg='augment.yaml', # Augmentation 설정
epochs=100
)결과:
Before: mAP 0.45
After: mAP 0.62 (38% 향상)

분석: 정상 이미지는 잘 찾지만
손상/오염은 여전히 부족
Phase 2: Synthesis (근본 해결)
# workers/synthesis/synthesizer.py
class DamageSynthesizer:
    def __init__(self):
        self.pipeline = StableDiffusionPipeline.from_pretrained(
            "nanonana/garment-damage-v2"
        )

    def generate_damaged_garments(
        self,
        garment_types=['jeans', 't-shirt', 'jacket'],
        damage_types=['hole', 'tear', 'stain'],
        num_per_combination=100
    ):
        """
        손상 의류 합성 이미지 대량 생성
        """
        synthetic_dataset = []

        for garment in garment_types:
            for damage in damage_types:
                prompt = f"{damage} on {garment}, realistic product photo"

                for i in range(num_per_combination):
                    image = self.pipeline(
                        prompt,
                        num_inference_steps=50,
                        guidance_scale=7.5
                    ).images[0]

                    # 품질 검증
                    if self.validate_quality(image):
                        synthetic_dataset.append({
                            'image': image,
                            'label': damage,
                            'garment': garment
                        })

        return synthetic_dataset

# 실행
synthesizer = DamageSynthesizer()
synthetic_images = synthesizer.generate_damaged_garments(
    num_per_combination=500  # 조합당 500장
)

# 3 garment × 3 damage × 500 = 4,500장 생성
결과:
Before:
- 손상: 100장
- 오염: 50장

After:
- 손상: 4,600장 (실제 100 + 합성 4,500)
- 오염: 4,550장 (실제 50 + 합성 4,500)

mAP: 0.62 → 0.78 (26% 향상)
Phase 3: Hybrid (최종)
# train.yaml
model_config:
  # Algorithm-level
  class_weights: 'auto'  # 자동 가중치 계산
  loss: 'focal'          # Focal Loss

  # Data-level은 이미 적용됨
  # - Augmentation (online)
  # - Synthesis (offline)

# 최종 데이터셋
dataset:
  train:
    - 정상: 10,000장 (원본)
    - 손상: 4,600장 (원본 100 + 합성 4,500)
    - 오염: 4,550장 (원본 50 + 합성 4,500)

  strategy:
    - Augmentation: Online (학습 중)
    - Class Weights: Auto
    - Focal Loss: γ=2, α=0.25
최종 결과:
mAP: 0.78 → 0.86 (10% 향상)

클래스별 성능:
- 정상: 0.95 (변동 없음)
- 손상: 0.72 → 0.84 (17% 향상)
- 오염: 0.65 → 0.80 (23% 향상)

총 개선: 91% (0.45 → 0.86)
용어 정리표
┌─────────────────────┬────────────────┬──────────────────────────────┐
│     우리가 하는 것  │   정확한 용어  │            설명              │
├─────────────────────┼────────────────┼──────────────────────────────┤
│ 회전, 노이즈 추가   │ Augmentation   │ 기존 데이터 변형             │
├─────────────────────┼────────────────┼──────────────────────────────┤
│ 나노바나나로 생성   │ Synthesis      │ 새 데이터 생성 (Gen AI)      │
├─────────────────────┼────────────────┼──────────────────────────────┤
│ 소수 클래스 늘림    │ Oversampling   │ 불균형 해소                  │
├─────────────────────┼────────────────┼──────────────────────────────┤
│ 합성으로 소수 늘림  │ Generative     │ Synthesis + Oversampling     │
│                     │ Oversampling   │                              │
├─────────────────────┼────────────────┼──────────────────────────────┤
│ 학습 중 실시간 증강 │ Online         │ 매 에폭마다 변형             │
│                     │ Augmentation   │                              │
├─────────────────────┼────────────────┼──────────────────────────────┤
│ 미리 증강 저장      │ Offline        │ 학습 전 디스크 저장          │
│                     │ Augmentation   │                              │
├─────────────────────┼────────────────┼──────────────────────────────┤
│ 클래스별 가중치     │ Cost-sensitive │ 알고리즘 레벨 해결           │
│                     │ Learning       │                              │
└─────────────────────┴────────────────┴──────────────────────────────┘
선택 가이드
데이터 부족 정도별 전략
def choose_strategy(data_count, imbalance_ratio):
    """
    데이터 양과 불균형 정도에 따른 전략 선택
    """
    if data_count > 10000:
        if imbalance_ratio < 10:
            return "Augmentation만으로 충분"
        else:
            return "Augmentation + Class Weights"

    elif data_count > 1000:
        if imbalance_ratio < 50:
            return "Augmentation + Oversampling"
        else:
            return "Augmentation + Synthesis + Weights"

    else:  # data_count < 1000
        return "Synthesis 필수 + Hybrid 전략"
예시:
케이스 1: 충분한 데이터
- 정상: 50,000장
- 손상: 10,000장 (5:1)
→ 전략: Augmentation만

케이스 2: 중간 불균형
- 정상: 10,000장
- 손상: 500장 (20:1)
→ 전략: Augmentation + Class Weights

케이스 3: 심한 불균형
- 정상: 10,000장
- 손상: 100장 (100:1)
→ 전략: Augmentation + Synthesis + Focal Loss

케이스 4: 극심한 불균형 (우리 케이스)
- 정상: 10,000장
- 손상: 100장, 오염: 50장 (200:1)
→ 전략: Full Hybrid (모두 사용)
구현 체크리스트
□ Augmentation 설정
  - 적절한 변형 강도
  - 도메인 특성 고려 (의류: 상하 반전 X)

□ Synthesis 품질 검증
  - 이상한 이미지 필터링
  - Domain Gap 확인

□ Oversampling 비율
  - 목표 비율 설정 (1:1 ~ 3:1)
  - 과도한 복제 방지

□ 알고리즘 설정
  - Class Weights 계산
  - Focal Loss 하이퍼파라미터

□ 검증
  - Validation Set은 실제 데이터만
  - Synthetic 데이터는 Train만
정리
핵심 원칙
1. "변형부터, 생성은 나중에"
   - Augmentation으로 시작
   - 부족하면 Synthesis 추가

2. "실제 데이터가 최고"
   - 합성 데이터는 보조 수단
   - 실제 수집이 우선

3. "검증은 실제 데이터로"
   - Train: 실제 + 합성
   - Validation: 실제만
   - Test: 실제만

4. "Hybrid가 최강"
   - Data-level + Algorithm-level
   - 복합 전략이 효과적
용어 외우기
Augmentation = 변형
Synthesis = 생성
Oversampling = 늘림

Online = 실시간
Offline = 미리

SMOTE = 보간
Generative = AI 생성

Class Weights = 가중치
Focal Loss = 어려운 것 집중
"데이터가 부족하다고? 방법은 있다."
Phase 1: Augmentation (회전, 노이즈)
Phase 2: Synthesis (AI 생성)
Phase 3: Hybrid (알고리즘 조정)
올바른 용어를 알면 팀 소통이 명확해진다.
"회전시키고 노이즈 주는 건 Augmentation이야!"
'AI · ML > Computer Vision' 카테고리의 다른 글
| AI가 100% 정확하지 않아도 괜찮다: Human-in-the-Loop로 만드는 의류 불량 검수 시스템 (0) | 2026.02.04 |
|---|---|
| PyTorch 하드웨어 의존성 제거하기: Hugging Face Accelerate로 갈아타야 하는 이유 (0) | 2026.01.28 |
| YOLO만 쓰던 개발자가 RT-DETR을 선택한 이유 (1) | 2026.01.21 |
| YOLO26: 엣지 디바이스를 위한 차세대 객체 탐지 모델 (0) | 2026.01.19 |